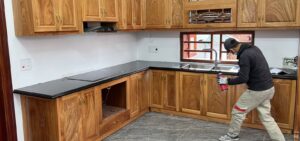
A fresh countertop fundamentally shifts the aesthetic character and functional utility of a kitchen or bathroom. Choosing granite involves selecting a material that is both strong and classic; opting for quartz provides precision-built durability; while laminate offers versatility without prohibitive costs. Achieving a professional result depends upon meticulous planning, accurate measurement, and a systematic execution of each setup phase. A successful fit begins long before the physical materials arrive on-site.
A smooth finish is the result of rigorous preparation. When installation steps follow a disciplined sequence, the results endure through years of consistent use. Professional attention is evidenced by how well the surfaces last, rather than merely their initial appearance. Each phase builds upon the previous one, ensuring that no structural or aesthetic detail is overlooked. This approach maintains the integrity of the cabinetry while providing a surface capable of withstanding daily rigors.
Pre-Installation Engineering and Measurement
Success is established during the initial assessment. Securing precise measurements stops cracks and alignment issues later, particularly where surfaces are not perfectly plumb. Most base cabinets feature a depth of 24 inches. Professional standards dictate an additional 1.5 inches beyond the front edge; this overhang ensures that spills do not directly impact cabinet doors. When executed correctly, countertops extend to a total depth of 25.5 inches.
It is essential to verify the cabinet line using a full-length leveling tool. If the cabinetry tilts, dense materials like stone may carry the load unevenly, resulting in structural cracks. Any identified slope must be corrected using slender wood wedges inserted beneath the frame. Adjustments must continue until the entire line is perfectly horizontal. Every piece should be fastened only once consistent height is confirmed across the entire run.
A wooden mock-up, or template, often initiates the process for premium surfaces. Builders shape rigid timber strips to mirror the countertop outlines exactly. Alternatively, digital laser scanners record every wall irregularity and plumbing location. This ensures the slab arrives precisely sized. By drawing measurements from the physical reality of the space, the margin for error is significantly reduced.
Systematic Removal of Existing Surfaces
Deconstruction must be handled with care to preserve the underlying cabinetry. Moving slowly protects the surfaces beneath, as minor missteps can weaken the framework. When approached methodically, the core elements remain undamaged and prepared for the new installation.
- Utility Management: Prior to removal, all water valves must be closed and plumbing traps disconnected. If the project involves a gas cooktop, a certified professional must handle the capping of the gas line.
- Mechanical Detachment: Fasteners within the cabinet interior, including screws and brackets, must be removed carefully. Each piece should detach easily to leave a bare mounting space.
- Breaking the Seal: Use a sharp blade to slice the sealant where the surface meets the wall. Moving slowly near storage units ensures a clean release. Work incrementally where material adheres tightly.
- Structural Extraction: Gently raise the worn surface with assistance. Rather than using the cabinet frame as a fulcrum, lift vertically. Excessive pressure can split the timber or distort the base.
Phase Three: Scribing and Precise Customization
Structural walls are rarely perfectly linear. Matching a straight countertop edge to uneven masonry or drywall requires scribing. This involves copying the wall’s unique profile onto the material so that gaps vanish upon final placement. This reconciliation between the slab and the architecture is a hallmark of professional installation.
Before applying adhesive, the countertop is set for a “dry fit.” A compass traces the wall’s shape along the rear edge of the material, serving as a guide for necessary cuts. Following this line, the slab is adjusted; a belt sander is utilized for laminate, while hardwood is smoothed using a planer. Stone counters are typically finalized off-site, guided by the initial mold or digital scan.
Seam Integration and Structural Fastening: Phase Four
In large-scale or L-shaped configurations, joining multiple slabs is unavoidable. The objective is to create a connection that is structurally sound and visually inconspicuous. A professional seam supports the weight of the material while fading into the background.
For laminate or timber, miter bolts (flip-bolt fasteners) are installed on the underside. These components allow the installer to apply mechanical tension, drawing sections into a unified surface. A color-matched epoxy or silicone compound is applied to the borders to bond segments and seal against moisture. Professional installers utilize suction tools to ensure the joint is perfectly flush and undetectable to the touch.
Once the adhesive has cured, screws secure the countertop to the cabinets. Driven upward from within the cabinet frame, fasteners must be the appropriate length for the material thickness. A fastener that is too long will penetrate and ruin the finished top side.
Backsplash Integration and Final Touches
The final phase involves sealing the system to protect the walls. Pressure is applied to the 4-inch backsplash while high-strength adhesive sets. Painter’s tape keeps pieces steady until the connection has fully hardened. This barrier is essential for the long-term health of the masonry.
A smooth line of silicone sealant is applied where the counter meets the wall and around the sink perimeter. This prevents liquid infiltration, protecting cabinetry from mold and rot. Following cleaning, porous stones like granite should be treated with a professional-grade sealer. This provides lasting protection against deep stains by blocking spills from soaking into the surface over time.
Long-Term Maintenance and Preservation
Countertop longevity is tied to its care. Because natural stone is porous, periodic resealing is necessary. Acidic substances like citrus should be removed immediately to prevent etching. While engineered quartz is resilient, it remains susceptible to thermal shock; the use of trivets for hot cookware is essential. Water pooling on wood or laminate can cause the substrate to swell or delaminate. Consistent maintenance ensures the investment remains pristine for decades.
Professional Outcomes for Home Remodeling
While basic installations can be managed independently, the complexities of stone fabrication and precision alignment necessitate professional expertise. A finish executed to professional standards ensures the kitchen remains functional and aesthetically pristine. Homeowners who require precision can rely on Denver Countertop Designs. We maintain strict industry standards across all services:
- Custom Quartz and Granite Fabrication
- Professional Cabinetry and Trim Installation
- Kitchen Backsplash Design and Tiling
Contact Denver Countertop Designs today for a consultation or detailed estimate. Our commitment to accuracy ensures that every detail receives full attention, delivering a space that is both beautiful and enduring. Professional execution meets your unique vision to create a home environment that lasts a lifetime.