A kitchen makeover usually begins when fresh countertops go in. Right there, where cooking happens, function meets look, linking cabinets to floors in one smooth sweep. Though some pick stone such as granite or quartz, each type needs sharp accuracy during setup plus solid prep work before placement. When done well, the top stays flat, joints blend close to seamless, and support underneath keeps splits away for years. Here is how the process unfolds step by step, starting with a mold made onsite and ending after the stone gets its final protective coat.
1. Site Setup and First Readings
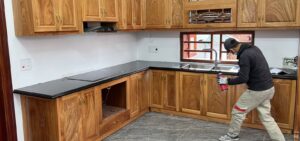
Getting measurements right kicks off every smooth countertop fit. Once cabinets go in, they need fastening to wall studs because skipping that step is not an option. If those bases tilt, the top will not lie flush, inviting cracks over time. A flat base matters most, so experts sweep laser devices across the units. Only when the whole span reads true does the stone get cut for the final installation.
Getting the template right comes after the cabinets are secure. A precise outline of the countertop is made, showing where the sink and power points sit. Stone and quartz will not bend once cut, so mistakes at this stage mean starting over. Each measurement needs checking twice because skipping this risks expensive rework later.
2. Selecting Materials and Manufacturing
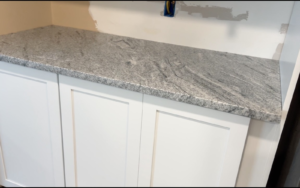
Most homeowners pick countertops by weighing how they look against how much care they need. Not needing sealant helps quartz stand out in today’s kitchen designs since it will not soak up spills. Granite brings something different because each slab shows patterns only nature can make. After deciding on the type and locking down the layout, work kicks off in a shop built for shaping heavy slabs.
Starting with the template, workers shape each slab using bridge saws along with high pressure water jets. Edge designs come next, including softened corners or curved contours which are all carved precisely. When more than one piece covers your countertop, they line up the grain so it flows like a single sheet. Support material is added to prevent cracks while setting the stone into place.
3. Move and Carry the Slabs
Heavy stone slabs challenge anyone moving them into a kitchen. This step often demands the most effort during setup. Each typical granite panel, three centimeters thick, weighs hundreds of pounds, so teams rely on tools and coordination to shift it without risk. These pieces travel upright because laying one flat could cause it to crack as stress builds where support fails.
Out front, the crew clears walkways and lays thick mats to guard floors. Suction handles grip each slab while dollies roll them past narrow turns and frames of doors. Every shift happens slowly while the team watches edges near built in units. Inside the kitchen, pieces rest briefly on base units to check gaps beside stoves and sinks. The fit gets tested without glue first to ensure the space is perfect.
4. Countertop Placement and Seam Alignment
With the dry fit checked, workers start fixing the stone for good. Along the upper cabinet edges, they squeeze thin lines of strong silicone glue. That sticky material holds everything tight but still lets the building breathe and shift slightly. Down go the heavy pieces, with the biggest ones going in before the smaller sections.
Most times, joining stones takes careful hands. When two slabs come together, the space between them should nearly disappear. Suction tools known as seam setters draw the edges close, pressing with massive force. A tinted epoxy, blended by hand to match the stone shade, flows into the opening. After it sets, workers remove what spills out. Then comes light sanding until the line feels even with the rest of the surface.
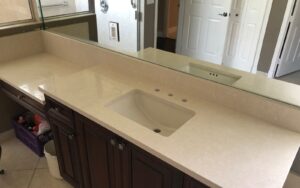
5. Install Sink and Complete Details
Underneath the counter, many kitchens today hide the sink edge by mounting it below the surface. Once the countertop settles into place, workers fit the basin and lock it tight using clips made strong to hold corners while sealant fills gaps. Centered right inside the hole carved in stone, alignment matters more than weight. That bead of silicone keeps water from sneaking down where wood meets metal.
Once the sink sits right, they add the backsplash when it matches the countertop material. Smaller pieces of rock get stuck to the wall using strong glue. A line where the counter meets the wall gets sealed with material that looks just like the stone. That squeeze of sealant stops water from sneaking behind cupboards. They check every hole for the tap to make sure the size fits the fixture.
6. Sealing and Post Installation Care
Sealing comes last when setting up granite or marble surfaces. A liquid guard slips into tiny holes within the rock, blocking spills from leaving marks. Because quartz is built without openings, there is no need for such protection here. With steady strokes, the worker spreads the solution, waits as needed, and then wipes off what remains.
Once everything is set, the crew walks through one last time alongside the homeowner. Smoothness along every edge is verified, just like how tightly each seam fits together. Leveling of the countertop surfaces receives close attention as well. Care tips follow, such as skipping abrasive cleaners and always placing cutting boards down first. Surface protection habits make a difference later, keeping things both pleasing and practical over time.
7. Conclusion
Lifting slabs into place takes strength, yet precision guides every cut. Before any stone touches cabinetry, frames must sit perfectly even across their base. Each stage matters because mistakes show fast, especially near sinks or stoves. When joints shine smooth, it means someone paid attention mid process. A well built layout supports chopping, spills, and heat without cracking or shifting months later.
Surfaces endure longest if fitted right the first time. Even minor gaps lead to trouble down the road, such as trapped moisture. Home upgrades often hinge on unseen details done quietly behind closed doors. Long term results reflect effort applied early and not fixes added late.
Start now by reaching out to Stone City if new kitchen surfaces are on your mind. Get in touch for a skilled review plus an accurate cost breakdown. Our crew walks you through Precision Stone Fitting and Professional Countertop Assembly so results match your vision. Another option involves our Custom Kitchen Remodeling Services where we handle every step of the overhaul smoothly. Start fresh when it comes to your home. Get in touch today because experienced hands are ready to shape the kitchen you have imagined.