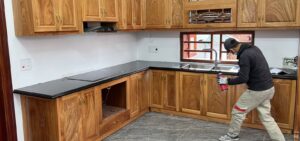
Ever set a heavy pot on your kitchen counter and noticed a slight flex or uneven edge? The very fact that they are slightly unstable is what creates the difference between installing butcher block countertops and other surfaces. Wood moves. It swells, shrinks and responds to water, and when you fail to consider that in the installation process, even the most attractive countertop will warp, crack or separate within months.
Butcher block countertops are not merely a matter of slapping down a piece of wood and nailing it in. It is a procedure that has accurate measurements, humidity, accurate fastening, and finishing methods that safeguard the wood but should not shut it out to allow the wood to breathe. Each step counts, in case you want to get a long-lasting clean result.
Choosing the Right Butcher Block Before Installation
Not all butcher block slabsare built the same, and the installation approach changes depending on what you buy. The three most common styles are edge grain, end grain, and face grain countertops.
- Edge grain butcher blockis the most common for kitchens. It’s stable, durable, and easier to install.
- End grain butcher blockis thicker and heavier, often used for cutting surfaces. It requires stronger cabinet support.
- Face grain countertopsshow wider wood patterns but are more prone to movement.
The level of moisture is essential. A slab which has not adjusted itself to your home will move once installed. Always leave the wood in your kitchen for 48–72 hours before cutting or mounting. This enables the material to adapt to humidity and temperature of your room.
Tools and Materials You Actually Need
Omission of the appropriate tools results in sloppy cuts, inaccurate positioning, or poor fixation. To install it correctly you will need:
- Circular saw with a fine-tooth blade(for clean cuts)
- Jigsaw(for sink cutouts)
- Drill with pilot drill bits
- Clamps for securing the slab during cutting
- Measuring tape and carpenter’s square
- Wood screwsand washer-head screws
- Silicone adhesive or construction adhesive
- Sandpaper (120 to 220 grit)
- Food-safe mineral oilor polyurethane finish
All these have a particular role to play. As an example, washer-head screws ensure the wood does not split and at the same time the countertop is firmly held in place.
Measuring and Cutting Without Ruining the Slab
Most installations fail in accurate measurement. Abutcher block can’t be “forced” into place like laminate, it must fit precisely.
Always begin by measuring the base of the cabinet and not the wall. Walls are only seldom straight and then it is best to give an expansion of 1/8-inch between the counter top and the wall.
When cutting:
- Mark your cut line using a straight edge
- Apply painter’s tape along the cut to reduce tear-out
- Cut with the finished side facing down (for circular saws)
For sink or cooktop openings, use a template. Drill starter holes in each corner, then use a jigsaw to follow the outline. Keep the blade steady, any wobble will show once installed.
Sealing Before Installation (Not After)
Installing and then sealing up is one of the largest errors. Raw wood is not uniform in its uptake of moisture, particularly at the underside.
Before the laying of the slab:
- Coat all sides with mineral oil or wood conditioner.
- Do not miss the underside that is where moisture accumulation leads to warping.
- Allow the wood to dry the finish a few hours.
When using polyurethane, apply at least two layers, and ensure that the paint is well-dried. This provides a waterproof shield against water damage, particularly in sinks.
Positioning and Dry Fitting the Countertop
Never secure the countertop immediately after placing it. Start with a dry fit.
Place the slab on the cabinets and check:
- Overhang (typically 1 to 1.5 inches)
- Alignment with cabinet edges
- Gaps along walls
If the wall is uneven, you may need to scribe the wood, this means trimming the edge to match the wall’s contour.
This step ensures you don’t lock in mistakes that are difficult to fix later.
Securing the Butcher Block the Right Way
Wood needs room to expand. If you screw it down too tightly, it will crack or bow.
Here’s the correct method:
- Use slotted brackets or drill elongated holes in the cabinet supports
- Insert screws with washers, allowing slight movement
- Do not overtighten, snug is enough
Apply a small amount of construction adhesive in key areas, but don’t rely on glue alone. Mechanical fastening is essential for stability.
Avoid screwing directly through the top surface. Always secure from underneath through the cabinet frame.
Installing Around Sinks and Appliances
Sink areas are the most vulnerable points in any butcher block countertop installation. Water exposure here is constant.
For drop-in sinks:
- Apply a bead of silicone sealant around the cutout edge
- Set the sink and tighten clips evenly
For undermount sinks:
- Reinforce with brackets or a support frame
- Seal edges thoroughly with waterproof sealant
Around cooktops, maintain proper clearance and avoid direct heat exposure on untreated wood edges.
Sanding and Finishing for a Professional Look
Even pre-finished countertops benefit from final sanding. This smooths out any rough edges created during installation.
- Start with 120 grit sandpaper
- Move to 220 grit for a smooth finish
- Always sand in the direction of the wood grain
After sanding, wipe away dust and apply your final finish:
- Mineral oil for a natural look (requires regular maintenance)
- Polyurethane for a durable, water-resistant surface
Multiple thin coats are better than one thick coat. Let each layer dry completely before applying the next.
Handling Seams Between Multiple Sections
If your kitchen requires multiple slabs, joining them properly is critical.
Use butcher block connectors or joining bolts underneath the seam. Apply wood glue along the joint edge and tighten evenly.
Make sure:
- Both surfaces are level before tightening
- Excess glue is wiped immediately
- The seam is sanded lightly after drying
Poor seam alignment is one of the most noticeable flaws in countertop installations, so take extra time here.
Preventing Future Warping and Damage
It is half the battle to be installed. Wood countertops do need regular maintenance in order to remain stable, particularly due to the fact that butcher block countertops are sensitive to the changes of moisture and other environmental factors.
Never expose water at an extended duration. It can creep into the wood fibers even a little standing water around the sink or in small areas adjacent to seams. This results in swelling, dark spots and ultimately warping over time. When you are applying an oil-based finish, apply mineral oil on the surface after a few weeks so the surface remains conditioned and does not absorb moisture. This is not some sort of optional maintenance; this is what prevents drying and cracking of the wood.
The indoor humidity also has a direct impact on the behavior of your countertop. In case of over-dry air, the wood shrinks and can form tiny openings or cracks. Excessive humidity may lead to cupping or wall and cabinet pressure due to expansion. Maintaining a balanced indoor environment will ensure that the countertop will be stable during seasonal changes. Wood continues to be a living material, despite the proper sealing, and the failure to consider these aspects will reflect in the performance.
Common Installation Mistakes That Cause Failure
Most issues with butcher block countertops trace back to a few avoidable errors:
- Skipping acclimation before installation
- Sealing only the top surface
- Screwing the slab too tightly
- Ignoring expansion gaps
- Using the wrong blade for cutting
Each of these leads to visible damage, cracks, cupping, or uneven surfaces. Precision and patience matter more than speed.
Getting a Clean, Long-Lasting Result
Installing butcher block countertops is a balance between structure and flexibility. You are dealing with a natural substance that responds to its surroundings and therefore each step, whether of measuring to seal, must not ignore that motion.
A well-installed butcher block doesn’t just sit on cabinets. It blends with the space, remaining flat, steady, and aesthetically smooth decades into use. When you use the correct process, you will not only have a functional surface, but also provide comfort and personality to your kitchen.
And when you need that degree of accuracy and do not have to second-guess the cut, seal, and support, hiring someone such as Denver Countertop Designs, makes the job a one-time thing.